Effortless Rendering in After Effects
This article will explore the nuances of exporting AE compositions to create high-quality movie files that can be shared, distributed, or further edited in video editing software. You’ll discover various export options, settings, and techniques that will enable you to bring your After Effects creations to life on the big screen. Join us as we unravel the art of exporting After Effects to move, unlocking a world of possibilities for your visual storytelling endeavors.
A Closer Look
Rendering plays a crucial role in After Effects, where frames of a movie are meticulously crafted by combining different elements within a composition. This intricate process involves layering elements, applying specific settings, and ensuring precision in each frame. It extends beyond the final output, encompassing the creation of previews for the Footage, Layer, and Composition panels, which can be saved as standalone movies for ultimate use.
The subsequent step involves encoding the frames into output files using one or more output modules. This encoding process transforms the frames into files suitable for the desired output format, essentially serving as an exporting process. It’s important to note that exporting is just one facet of the broader process, encompassing both frame generation and encoding for the final output.
To optimize the process in After Effects and achieve improved speed and accuracy, there are various options available. One such option is leveraging GPU acceleration. By accessing the GPU effect options within the Project Settings dialog box and selecting the Video Rendering and Effects dropdown, you can tap into the power of your GPU for a more rapid and efficient process. This menu has a range of options that enable you to harness the capabilities of your GPU, enhancing the overall performance. The available options include:

- Mercury Software Only: Effects are rendered using the CPU;
- Mercury GPU Acceleration: Effects are rendered using the GPU. On macOS, you can utilize OpenCL or Metal, while on Windows, CUDA or OpenCL is used, depending on your selection.
Upon completing a composition in After Effects, the next step is to generate a movie file. There are two distinct methods available for outputting a movie file, and your choice should be based on your specific requirements.
Optimizing Output in After Effects: Choosing the Right Approach for Your Movie Files
When it comes to creating movie files in After Effects, different scenarios call for different approaches. Here are two key considerations:
- High-Quality Output: If you’re aiming for exceptional quality in your movie file, especially for integration into Premiere Pro or other video editing, compositing, or 3D graphics applications, the recommended route is to render it using the After Effects Render Queue. This grants you full control over the process, ensuring the highest possible quality for your final output, whether it includes an alpha channel or not;
- Compressed Output: When your goal is to produce a compressed movie file for web playback or DVD/Blu-ray usage, the ideal method is to encode it using the Adobe Media Encoder. This powerful tool allows you to create optimized movie files tailored specifically for web, DVD, or Blu-ray formats. With a range of compression options and presets at your disposal, you can strike the perfect balance between file size and visual quality.
In After Effects, there are multiple ways to generate output for your projects. You have the option to create a single output file containing all the frames, or you can generate a sequence of still images that are commonly used for film recorders. To accomplish this, you can utilize the After Effects Render Queue or the Adobe Media Encoder queue, depending on your preferences and configured settings.
The Queue in After Effects is equipped with a built-in version of Adobe Media Encoder, which makes it convenient to encode your compositions into various movie formats directly within the Queue panel. When you initiate operations in the Render Queue, the embedded Adobe Media Encoder automatically activates. This integrated tool provides export settings dialog boxes that allow you to fine-tune encoding and output settings according to your specific requirements. With this functionality, you have the flexibility and customization options to achieve the desired results for your projects.


By understanding these approaches and using the right tools, you can ensure optimal results when exporting After Effects compositions as impressive movie files for your visual projects.
How to Render and Export in After Effects
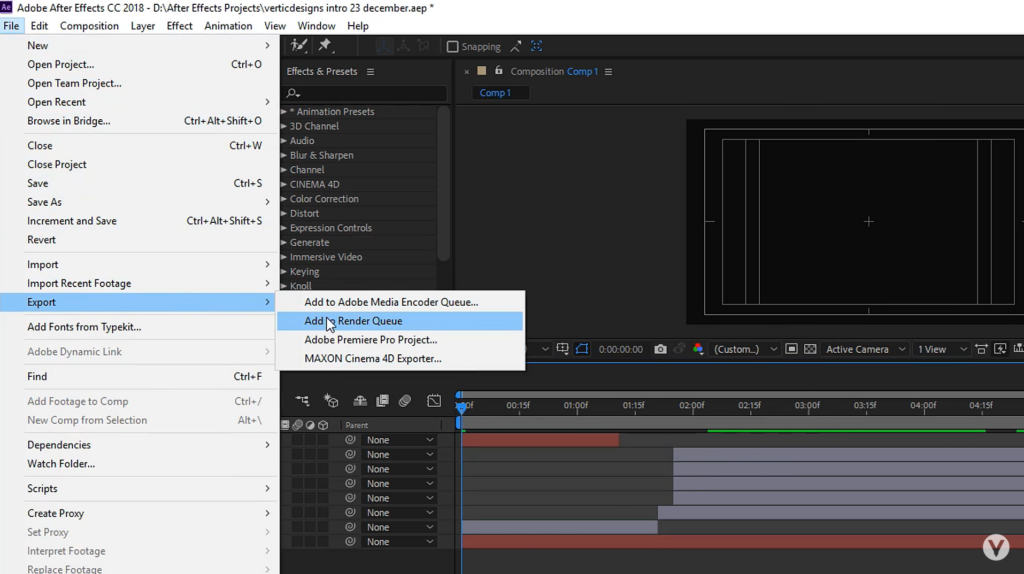
To export your After Effects composition, there are four different methods you can use. You can access these methods by selecting one of the following options:
- File > Export > Add to Render Queue;
- Composition > Add to Render Queue;
- Drag and Drop from Project Window (ideal for downloading multiple animations);
- Keyboard Shortcut CMD+CTRL+M;
- If you choose to use the File menu in After Effects, simply navigate to File and scroll down to Export. From there, select Add to Render Queue, and the Render Queue window will automatically open.
Simplify and expedite the process of sending your After Effects animations to the Render Queue by taking advantage of various techniques and features. One efficient method is to utilize the Composition menu, located in the top menu bar. By clicking on “Composition” and selecting “Add to Render Queue,” you can effortlessly add your composition for rendering, streamlining the workflow.
To further enhance productivity, leverage the drag-and-drop feature within After Effects. Instead of manually navigating through menus, you can easily locate your desired compositions in the Project panel and seamlessly drag them directly into the open Render Queue window. This intuitive method enables quick and convenient exporting without the hassle of additional steps.
For even more time-saving capabilities, consider utilizing the keyboard shortcut Command + Control + M. By ensuring the composition window is selected, you can render a single composition or select multiple compositions within the Queue. Pressing the shortcut will initiate the rendering process, allowing you to efficiently progress through your workflow.
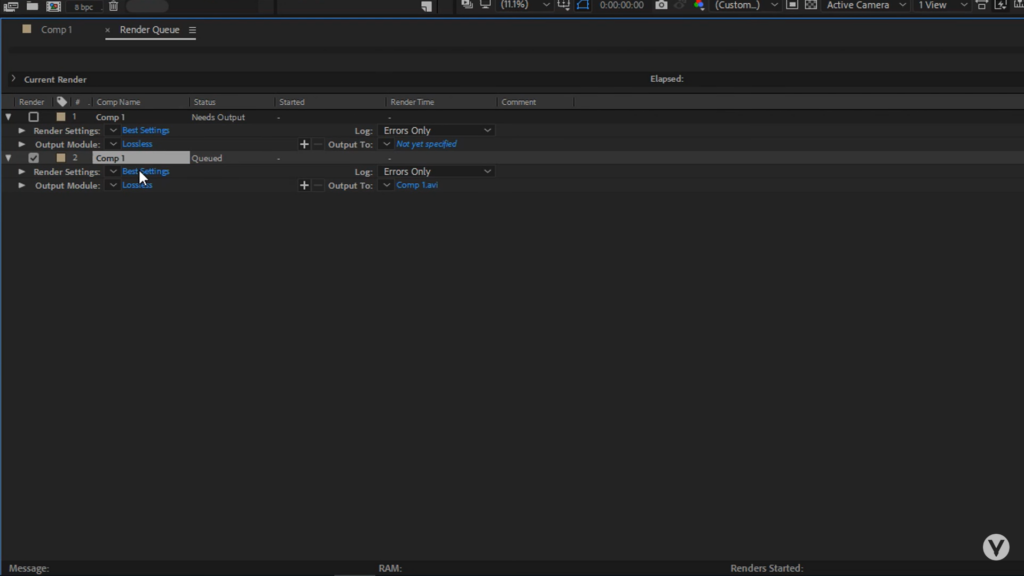
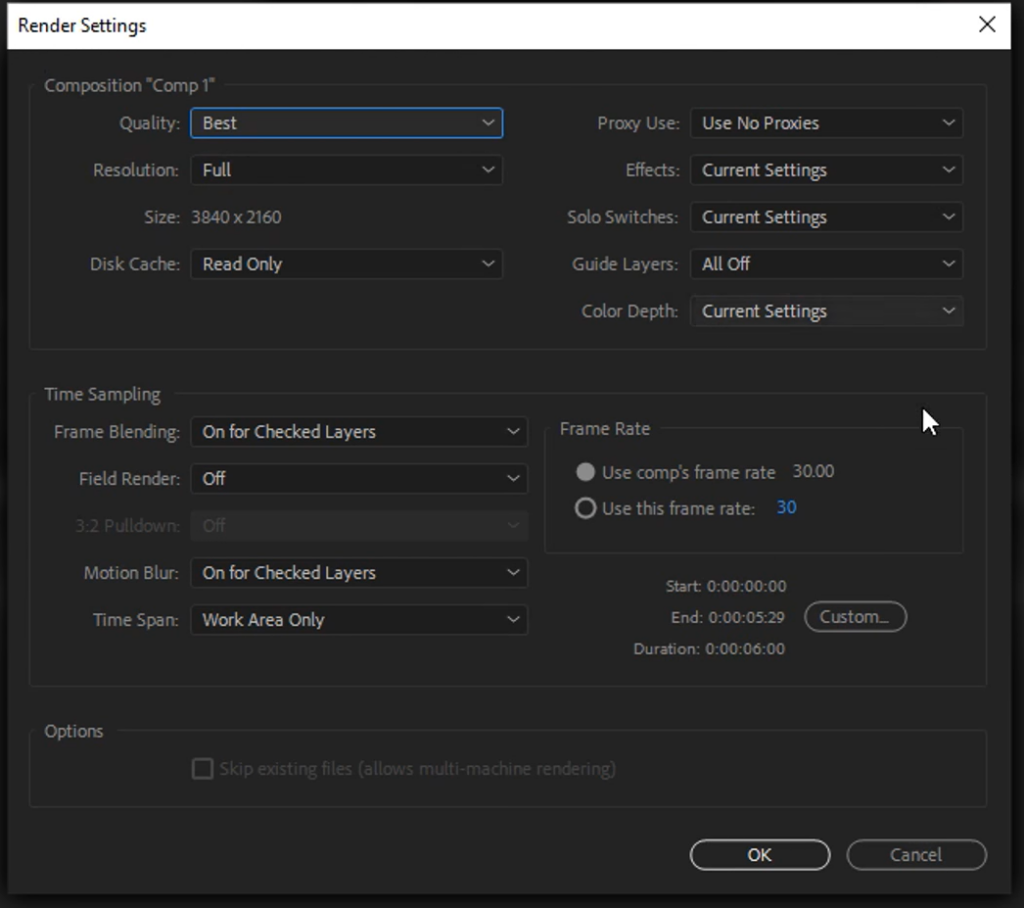
To achieve the desired output, take advantage of the Settings feature in After Effects. Situated below your composition in the Queue, this functionality enables you to fine-tune various settings such as quality, resolution, and more. By adjusting these parameters, you can optimize your final result according to your specific requirements.
When it comes to selecting the appropriate codec for your file, navigate to the Output Module option within the Queue. Located below the Settings, you can access the Format section, where you can choose the desired file format such as Quicktime or AIFF. By carefully selecting the right codec, you can ensure optimal playback and compatibility for your rendered animations.
To easily specify the destination folder for your file, utilize the Output To option. This feature is situated across from the Output Module option below your composition in the Queue. By choosing the desired location where your file will be saved, you can ensure easy access and organization of your animations, promoting efficient workflow management.
Render and Export Films with the Render Queue
To create a movie from a selected composition in the Project panel, follow these steps to add the composition to the render queue:
- Select the desired composition in the Project panel.
Choose one of the following methods to add the composition to the render queue:
- Go to Composition > Add To Render Queue;
- Simply drag and drop the composition onto the Render Queue panel.
To define the output file name and location in the Queue panel, follow these steps:
- Click the triangle icon next to “Output To” to access the output file options based on a naming convention;
- Choose a location or enter a custom name for the output file.
Refer to the “Specify filenames and locations for rendered output” for more details.
To configure the settings and output module, use the following steps:
- Click the triangle icon next to “Render Settings” to select a settings template or customize the settings;
- Consult the “Render settings” section for further guidance;
- Choose the desired log type from the Log menu. The path to the log file will be displayed under the Settings heading and Log menu.
For output module settings, use the following steps:
- Click the triangle icon next to “Output Module” to choose an output module settings template or customize the settings;
- Customize the file format of the output movie using the output module settings;
- Depending on the chosen format, a format-specific dialog box may appear to adjust format-specific settings;
- Note that new preferences will default to High Quality in the output module settings.
Once you have specified the output name, location, settings, and output module, the render item in the column will be automatically selected (indicated by a check mark), and its status will change to “Queued.” This status indicates that the render item is now in the render queue, ready to be processed.
Click on the Render button located in the upper-right corner of the Render Queue panel to initiate the process.
Rendering a composition into a movie can take varying durations, influenced by factors like frame size, quality, complexity, and compression. To speed up the process, try Multi-Frame Rendering.
After a render item finishes, it stays in the Render Queue panel as “Done” until you remove it.
Render Queue Panel Options
The AE Render Queue panel is a valuable tool for monitoring renders. It provides detailed info on progress, including concurrent frames, current frame time, and start/end frames. Elapsed shows time passed, Remaining estimates time left. You can view Estimated Size and Free Space. The Current Render bar visually represents memory usage: bright green for rendering frames, blue for saved frames, and dark green for pending saves.
To manage items efficiently, right-click (Windows) or Control-click (macOS) in Project panel to select source composition. Deselect in Render column to remove from queue. Select to change status from Unqueued to Queued. Remove completely with Delete or Edit > Clear. Rearrange by dragging or using Layer menu options. Use shortcuts to move selected items. Duplicate by right-clicking (Windows) or Control-clicking (macOS) and selecting desired command.
Pausing, Stopping, and Resuming Operations
In After Effects, if your disk runs out of space while rendering and exporting, the software will automatically pause the operation. To resume after clearing disk space, select the Pause button and then click Continue.
To pause and resume a task, you can utilize convenient keyboard shortcuts. On Windows, you can press Alt and click the Stop button, while on macOS, you can press Option and click Stop. This method halts the current rendering item and labels it as “User Stopped,” while simultaneously adding a new item with the status “Queued” to the Render Queue panel. The newly added item maintains the original output filename and duration of the initial render.
If you wish to interrupt the rendering process temporarily with the intention of resuming it later, simply select the Stop option. This action assigns the item the status of “User Stopped” and generates a new item in the Render Queue panel marked as “Unqueued.” The new item features an incremented output filename and resumes rendering from the last successfully rendered frame of the paused item.
Queue Status Information
At the bottom of the Queue panel, you can find important details about the current render operations:
- Message: Displays a status message indicating the progress of the renders, such as “Rendering 1 of 4”;
- RAM: Shows the available memory for the rendering process;
- Renders Started: Indicates the date and time when the current batch of renders was initiated;
- Total Time Elapsed: Shows the total rendering time that has passed (excluding any pauses) since the start of the current batch of renders;
- Notify when queue completes: Enable this option to receive notifications via the Creative Cloud desktop app and mobile app when your render queue job or the entire queue is finished rendering.
Customize Your Sounds for a Personal Touch
In After Effects, you have the ability to personalize the sounds that play when your operations are complete. Instead of the default chime that signals a successful prossess, you can choose a unique sound that reflects your style and preferences. This allows you to add a personal touch to your workflow and make the completion of each job a more enjoyable experience.
Furthermore, if operation fails, After Effects provides a distinct sound to alert you. This helps you quickly identify any issues and take necessary actions to address them.
To change the sounds in After Effects, simply navigate to the preferences settings and explore the audio customization options. From there, you can select and assign your preferred sounds for successful renders and failures.
Conclusion
Exporting After Effects compositions to create movies is an essential part of the post-production workflow. Whether you’re aiming for a high-quality movie for professional editing or a compressed file for web or disc distribution, After Effects provides powerful tools like the Render Queue and Adobe Media Encoder. By following a simple step-by-step process, you can effortlessly add your compositions to the render queue, customize settings, and choose the desired output format. The Render Queue panel offers a range of options to manage items, reorganize the queue, and duplicate items for streamlined workflow management. With the ability to pause, stop, and resume rendering, you have full control and flexibility throughout the process.
